Monday, November 23, 2009

Footed Tidbit Plate


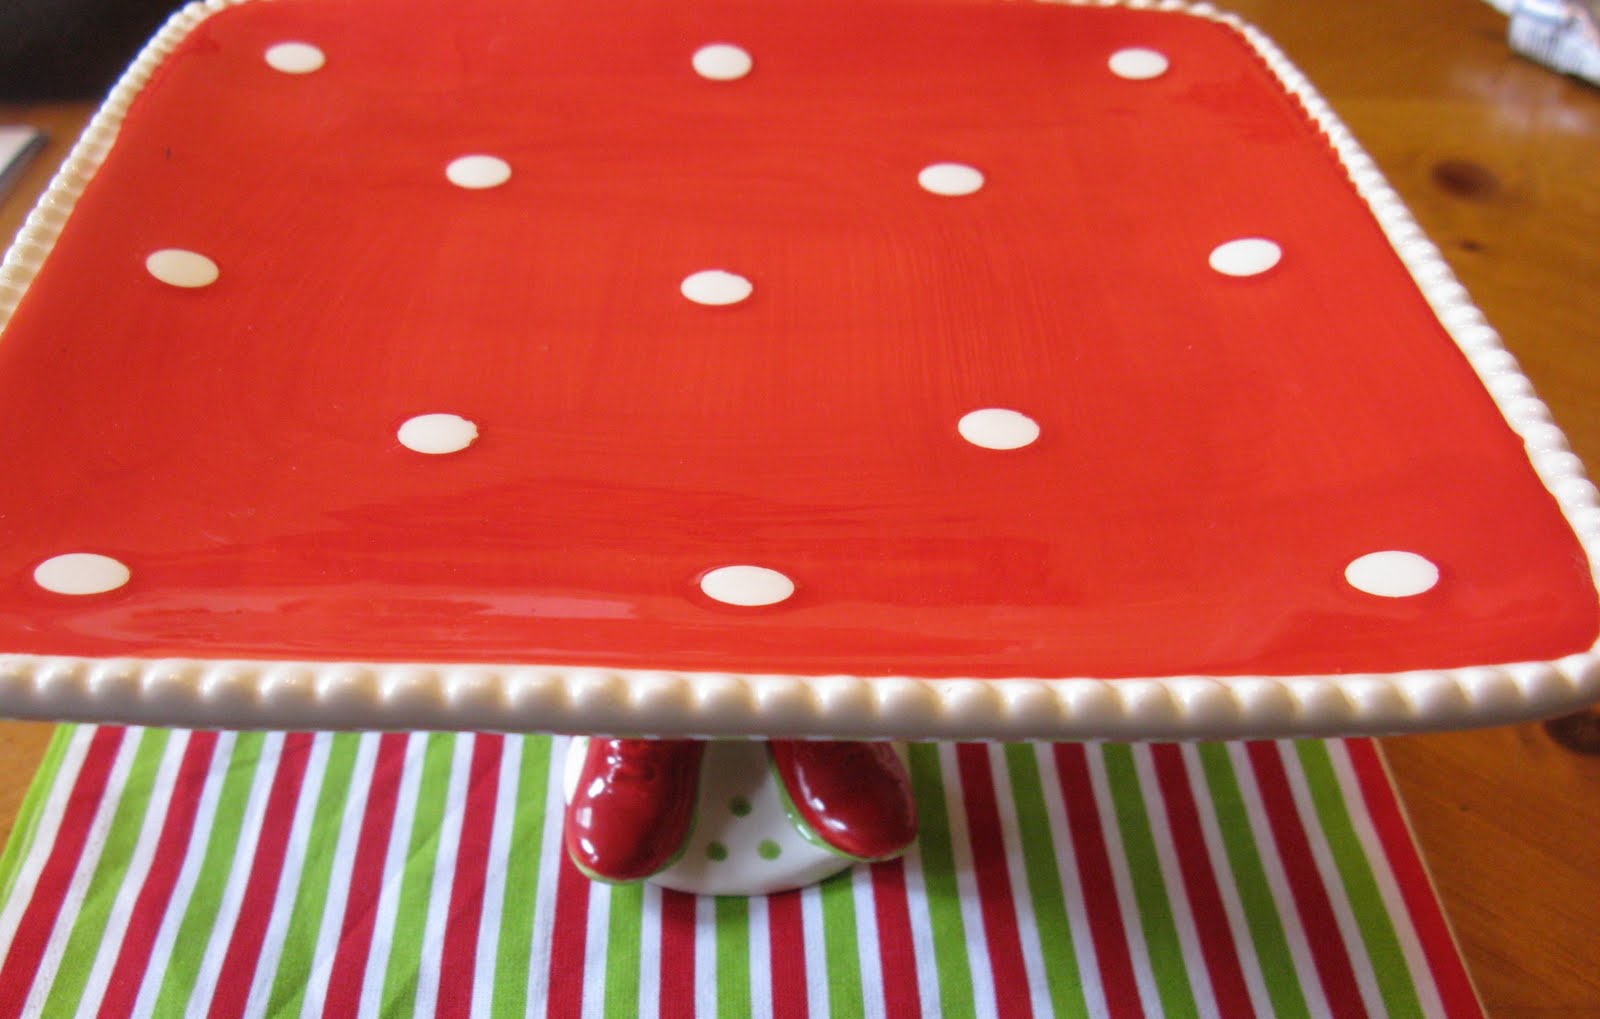
This is an oldie but a goodie.   There are many cakeplates made in BlogLand and I wanted to share this one that I made for my Christmas goodies.  Keep in mind that any combination made with a flat top as the base is possible, so keep your eyes open for something that will be creative and beautiful on your table.  Also, you can use smaller size plates as I did for this project. 

I chose a footed dessert cup that I found at Home Goods and a Red Polka dot salad plate. 


This is a quick, easy and inexpensive project.  The plate and footed dessert bowl were 2.99 each and you just adhere them with E6000 and let dry for 24-72 hours. 


Imagine how cute and festive this will look on a dessert table topped with cookies or brownie cut-outs.  Yum.
All the best,


Pin It!

Thursday, November 19, 2009

Tablescape Thursday - My Thanksgiving Table


I'm joining Susan and all the great tablescapers, featured weekly at Between Naps on the Porch.  Please take the time to visit and view the many beautiful and creative tables. 

This week, I've prepared my Thanksgiving table.  I've covered my table this week with Veranda Paisley tablecloth by Ralph Lauren.  The beige offers a nice backdrop for the other subtle autumn colors.


One of the things I like to do as I prepare for the holiday meal,  is to do as many things ahead of time as possible.  Setting my table ahead of time is a no brainer. 


Dinner plate and soup bowl is Bella Stoneware.  Salad plate is Citrus Dots from Home Essentials collection and purchased at Marshalls.  Wicker charger adds a natural element along with the pinecone napkin holder from Pier One. 


Flatware is Queens Garden from Reed and Barton. 


Porcelain pumpkins were purchased at Kohl's a couple years ago.  The leaf plates are from TJ Maxx and will be home to yummy yeast rolls on Thanksgiving day.


Tongs are Queen's Garden from Reed and Barton. 


Butter will be handy on the table to slather on the yummy yeast rolls I'll be serving. 


I love these sparkling tea lights I found at Kirklands.  The inside is mirrored and reflects the candlelight....they come in three shades - cream, amber and a deep bronze.


Fall hurricanes show beautiful colors when reflecting the candlelight.


I hope everyone has a wonderful Thanksgiving and are able to spend time with friends and family.  I'll be taking time to reflect on the many blessings I have been given and that I am most thankful for everyday.
All the best,


Pin It!

Tuesday, November 17, 2009

Multi Ribbon Bow Video Tutorial

This video from Keen's Floral Outlet in Scranton, Pa. is an excellent tutorial on how to make a multi ribbon bow .  This is the the best instruction that I have seen...very clear and easy to follow.  With Christmas just around the corner, I can think of plenty of applications...the mailbox, wreaths, etc. 

Enjoy your Holiday Bowing!!


All the best,


Pin It!

Sunday, November 15, 2009

Holiday Planner Project - Tutorial

I'm joining the Metamorphisis Monday party today with Susan at Between Naps on the Porch. 


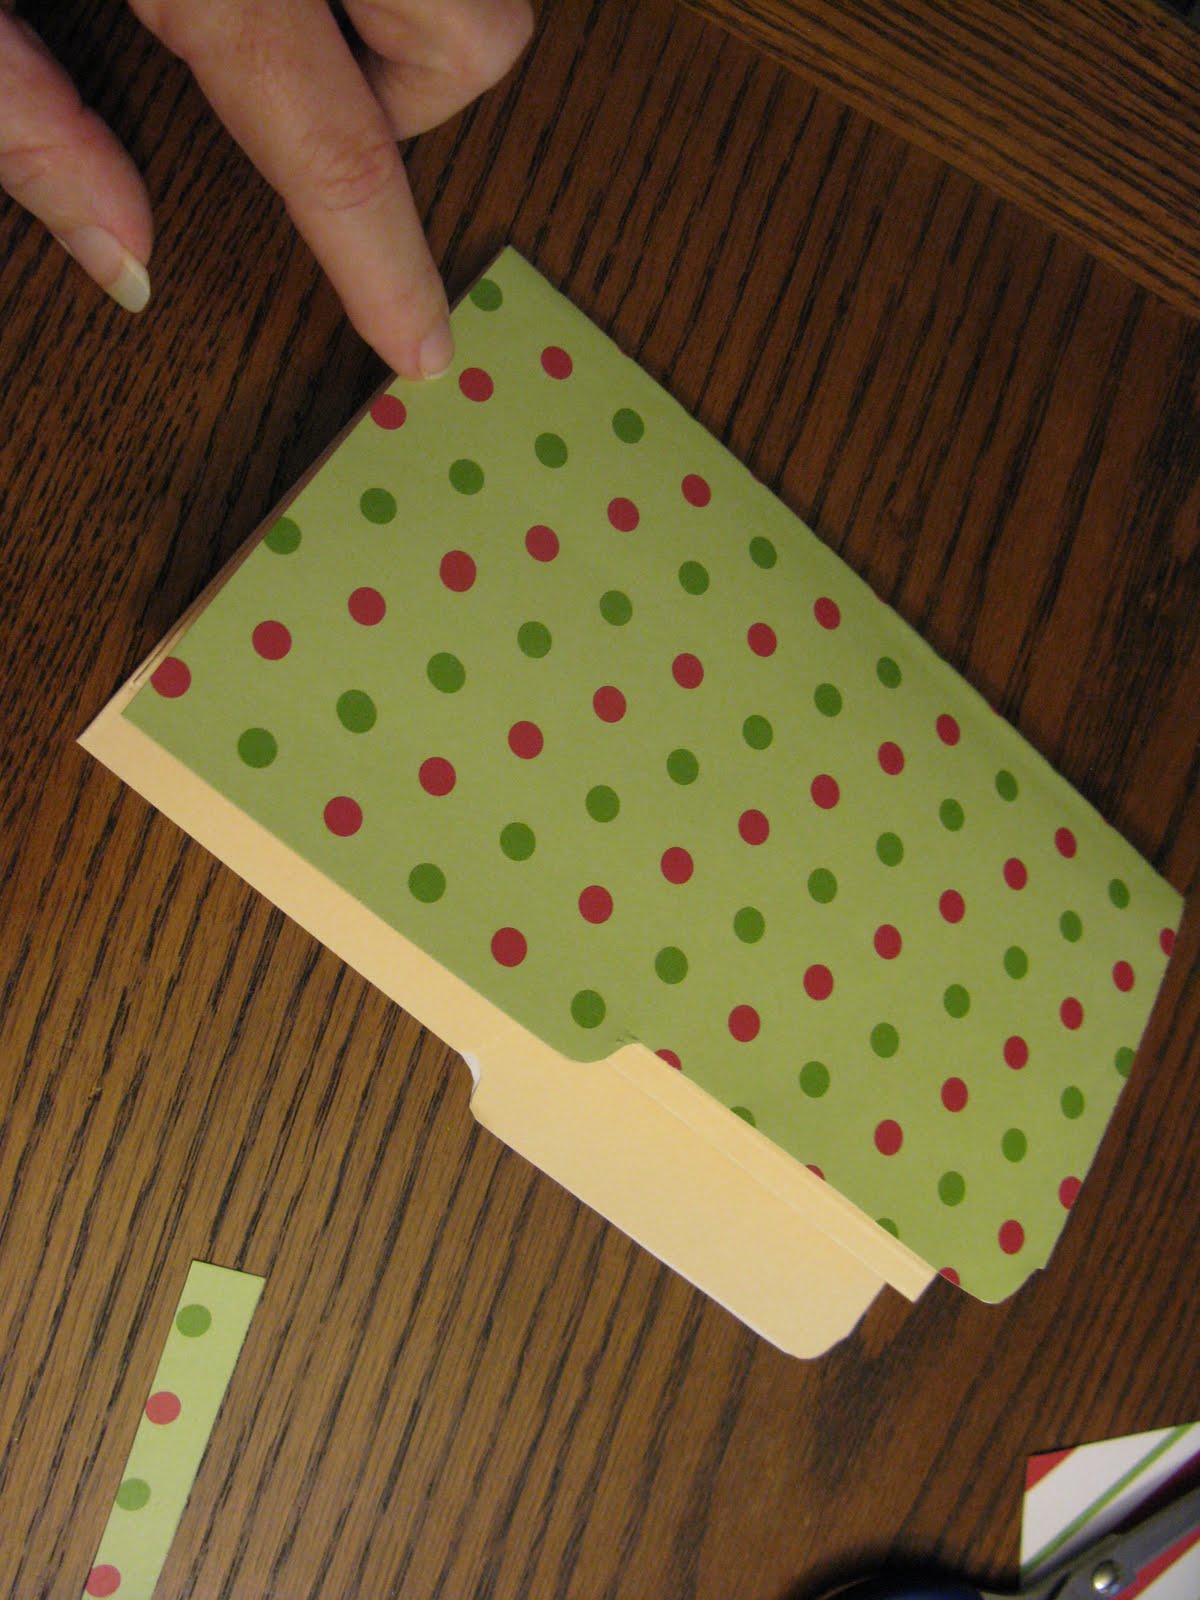
As I mentioned a few days ago, I am looking for a way to ease into the holidays.  I intend to be ready with everything needed accomplished or re-evaluated and set aside if I cannot complete and a firm decision to not stress of what is out of my control.  I am a list person...I love lists and that is how I stay organized and function day to day.  I always carry a small notebook with me to make journal entries, sketch ideas, keep shopping items etc.  This manilla folder technique will help keep me organized and can be adapted to be used as a holder for photos, an everyday planner or a holiday planner, as I have chosen to do.  I love this idea. 

Directions for the accordian file project can be found on the Splitcoast stamper website.  I've included their video showing the procedure to create the base folder from a regular left tab Manilla folder.


I decided to make a Christmas planner using Christmas themed scrapbook paper and embellishments.  For my needs, I chose the following for the pockets:

  • Calendar
  • Shopping Lists
  • To Do
  • Receipts
I covered my folder with scrapbook paper and embellishments but that is a personal choice.  You can leave the folder plain or use a colored manilla folder...there are some pretty patterned ones out there as well. 

I covered the outside of my planner like a book, however, if you want to allow for more expansion in the accordian pockets, you would use a seperate piece to cover the front and back cover. 


Use scissors to trim your cover paper to fit nicely around the tabs.


Cut papers to fit inside 'pages'...be sure and leave room for easy folding...don't oversize your paper.  The paper size to cover the bottom of the pockets is approx 4.5x3.75 inches. 


You will end up with 4 interior pockets.


All the best,


Pin It!

Friday, November 13, 2009

A Great Gift Idea, My Christmas CD Collection and Foodie Friday


Last Christmas, I moved my holiday CD collection from jewel cases to a much more efficient storage system using a tool called DiscGear....This storage system is so great that I thought it would be a great Christmas idea to share with all my blog friends.  This system can be used for your DVDs, music CDs, and computer/data CDs and keeps them organized and dust free within a very limited space and comes in several sizes. 

I have the 50 disc, 100 disc and 150 disc systems. 


You place the CD or DVD in the unit in the order you choose, alphabetical, by artist or actor, action or family etc.....the slot for each disc is numbered and there is a numbered list system at the bottom of the unit.


 In addition, there is a seperate book with plastic sleeves and a numbering system that you use to store your cover art from your CD/DVD.  The amount of space saved and the ease in finding the appropriate music or movie is unbelieveable.  I have a rather large movie collection and can find any one right away...I remove the movie, watch it and then it goes right back in the slot when finished.  If you have a movie or music enthusist on your Christmas list, this produ..if you are a visual person and want to flip through your movie covers to see what grabs you, this book is the thing.


I love Christmas music and add to my holiday collection yearly...I have my eye on two new CDs right now that I hope to capture soon.  I moved my collection from the jewel cases to a 50 disc DiscGear unit last Christmas and it makes storing much easier.  


For my Foodie Friday entry this week, I have a heavenly pancake recipe.   This recipe is quick and easy and I've used it for years...it's from Southern Living, so you know it has to be delicious.  When you and your family try it, you'll never make another Bisquick pancake again.  My husband loves these pancakes and swears they are better than any restaurant pancake he has had.


Buttermilk Pancakes
1 cup all purpose flour
1 tsp baking soda
1 Tbsp sugar
1/2 tsp salt
1 egg
1 cup + 2 Tbsp buttermilk
1 Tbsp vegetable oil

Combine dry ingredients (I use self rising flour rather than the all purpose, baking soda and salt).  Mix wet ingredients into dry mixture until blended....do not overmix - batter will be lumpy.  For each pancake, pour 1/4 cup batter on a lightly oiled griddle.  Turn pancakes when the tops are covered with bubbles.  Makes 8 4 inch pancakes.  Smother with butter and syrup and enjoy.

Thanks to Michael at Designs by Gollum for hosting this fun event...you can find other great recipes by checking here. 

All the best,


Pin It!

Wednesday, November 11, 2009

A Sprinkle Of Fall Tablescape

Welcome to my tablescape for this week.  I'm joining our wonderful hostess Susan for Tablescape Thursday.  You can see more tablescape ideas by joining the party at Between Naps on the Porch.

'I don't know anything about table decor...I'm just here for the acorns.'


You never know who you might run into on a tabletop.  Orange you glad you dropped by today. 


Take a quick look at one of my placesettings before Mr.Squirrel figures out that there is a very large nut to be had.  Wooden acorns are from Pier One.  Tablerunner from Kohls, Napkins from Pier One.


Chargers are from Home Goods, Dinner Plate is Bella, Salad plates are from Marshalls, Flatware is Hampton but I don't remember the pattern, amber tea goblets are Breeze by Noritake.


Terra Cotta Flowerpots used for flowers and as candle holders are from Southern Living at Home. 


Mr Squirrel is from Cracker Barrel and looks like he has been busy gathering lots of nuts.  Thanks for dropping by today.


All the best,


Pin It!

Tuesday, November 10, 2009

My List Dilemma


How do you cope when your list of things to do becomes so large that you can't decide where to start.  I have so many things to do - some that I have started but not finished and some that I would love to see completed before Christmas.  I'm starting to feel a bit stressed and I refuse to enter the season in that mood.

The really sad thing is that this is just the first page of a very long list and doesn't include the smaller items, like decorating the tree, baking etc, which of course will have to be done no matter what.  I also have a glider to recover for my daughter's nursery (remember new GB in Dec!!) and two computers that I have promised to work on for family to remove computer viruses and restore function. 

I'm thinking about breaking the projects down into smaller timeframes that I can apply after work during the week and when I'm not otherwise engaged on the weekends - This time of year is always so busy and coming up  - two of the Grandbabes birthday parties, Thanksgiving, North Pole Limited Train Excursion, Downtown Starlite Parade, Christmas shopping trips, birth of GB number 4 and Cookie Swap party. 

How do you handle your 'To Do' List....I usually have two or three projects going at a time.  I've learned multi-tasking from many years in the Corporate world, so I am now totally incapable of concentrating on one thing before moving to the next...drives my Hubs crazy. 


All the best,


Pin It!

Monday, November 9, 2009

Gift Wrapping Tips


One of the things that I have been certain of over the past few years is that it is only a hop and skip to Christmas once Halloween is over.  I believe that the cosmos speeds up at this time, creating a time warp that blends every 3 days into a 1 day timeframe, so that before you know it...before you have time to properly prepare, the big day is upon you.  For those of us who love the holidays and spend hours and days agonizing over getting the decorations just right and making sure we have enough snacks and sweets to feed a small third world country, this speed up in the space-time continium can be daunting.  In the spirit of thinking ahead, I have a couple of gift wrapping tips that may prove helpful in preparing for a less-stress holiday.
One of the most annoying things to deal with is finding your giftwrap items, especially when you buy your gifts over a period of time that encompasses several shopping trips.  This can be avoided by creating a gift wrapping station.  If you are not lucky enough to have a permanent gift wrapping station, set up a temporary station.  Some inexpensive ideas for creating a temporary station.
  •  Clear out a large dresser drawer and fill with your cutting tool, tape, ribbon, tissue paper, name tags and gift bags.  Place your gift wrap rolls in a tall plastic container, like an inexpensive tall kitchen trash can.  Rubbermaid has a couple of tall plastic containers made specifically to hold giftwraps.  Use the dresser top or the bed as your battleground for wrapping presents.
  • Use a large garbage can - the kind with wheels and a cover that will keep your materials sealed and clean.  Make sure your can is clean and place a smaller tall plastic container inside - a tall kitchen garbage can or one of the tall plastic containers made specifically to hold giftwraps.  Put all your materials, cutting tool, tape, ribbon, tissue paper, name tags and gift bags in this smaller container and you can lift it easily in and out of the larger garbage can.  Use the extra space in the large garbage can to store your purchases....the kids will never think to look in the garbage can to see if Santa has dropped something off early.  Keep your garbage can in the garage and roll inside as needed to use the kitchen table for wrapping. 
Some other tips:
  • Keep a package of the elastic bands for ponytails in your giftwrap station.  These bands are ideal for slipping on your giftwrap to keep the paper contained on the roll and not have the loose ends unrolling and making a mess or getting crumpled.

  • Get yourself a Scotch 3M brand pop up tape strip dispenser.  This little tool is invaluable...available for about $3-4 the band slips over your wrist and is easily accessible.  Eliminates the stretching to reach over and pull tape off of a tabletop dispenser...your hands are always close together when wrapping and you simply reach over a couple inches and pull off your pre-cut strip.  Be sure to always have an extra package of tape strips on hand.  


  • Another tool that I find more efficient and less awkward to use is the Scotch gift wrap cutter...this is a lightweight and slim tool that will replace the need for scissors in cutting your giftwrap.  Simply roll out your gift wrap to the right size needed and slip the giftwrap in the groove at the end of the cutter and slide it across the paper.  About $5.


I hope you find some of these ideas helpful.  Happy Holidays!!

All the best,


Pin It!